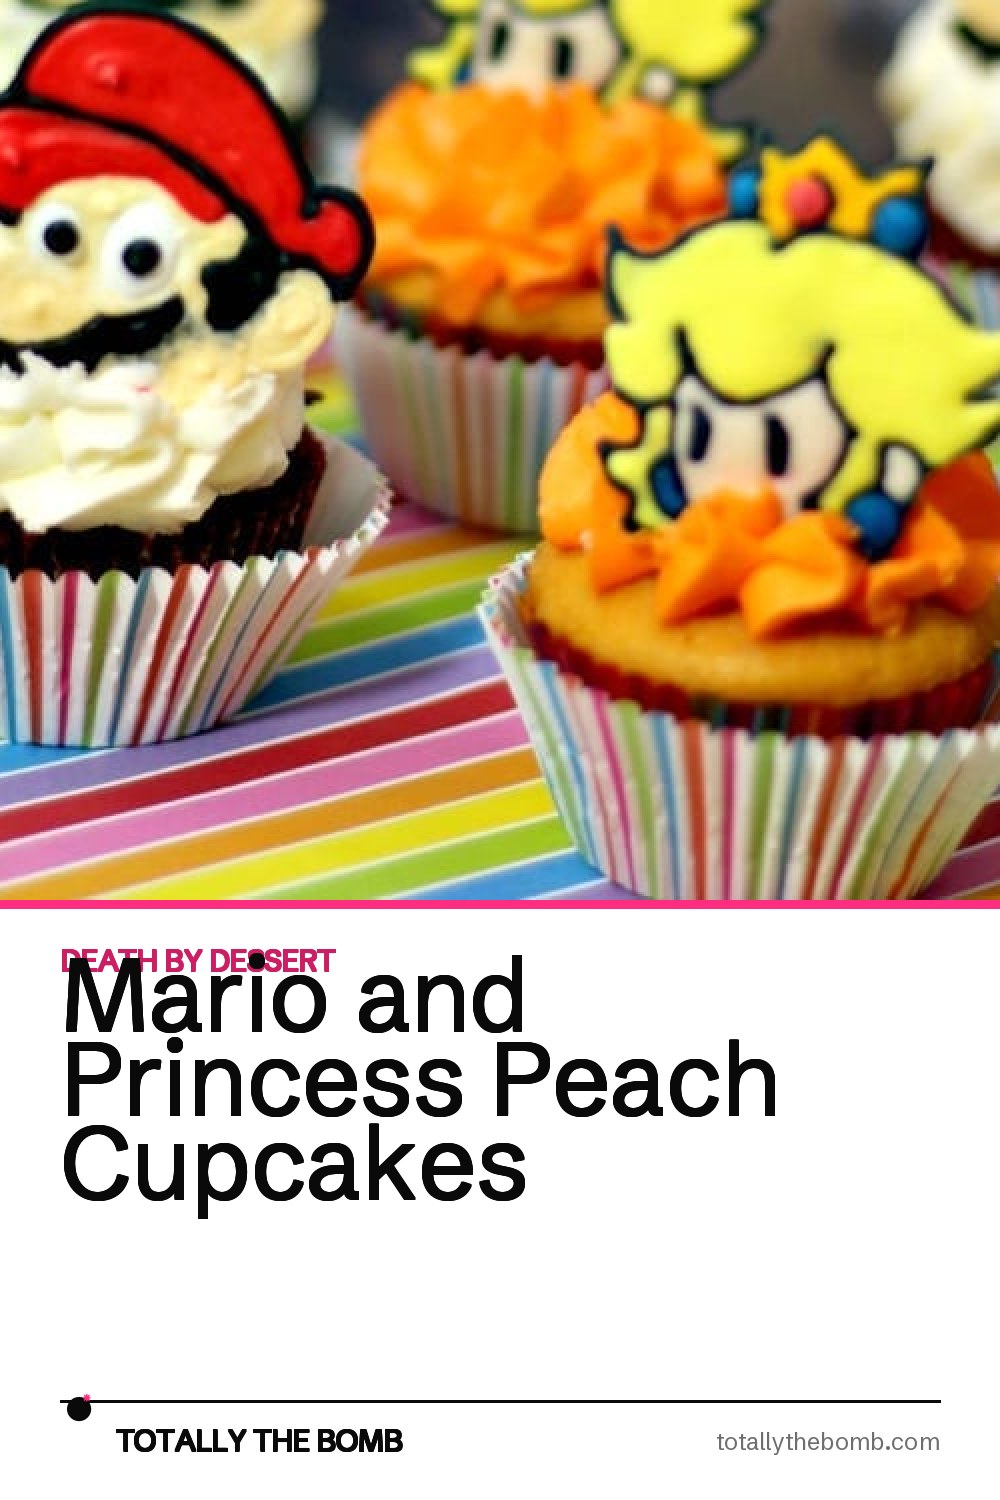
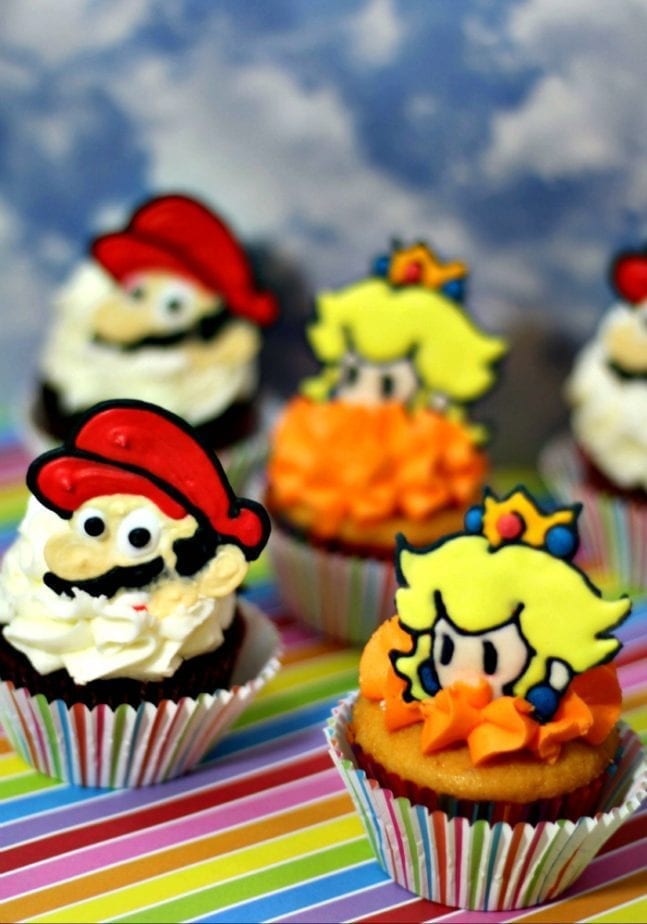
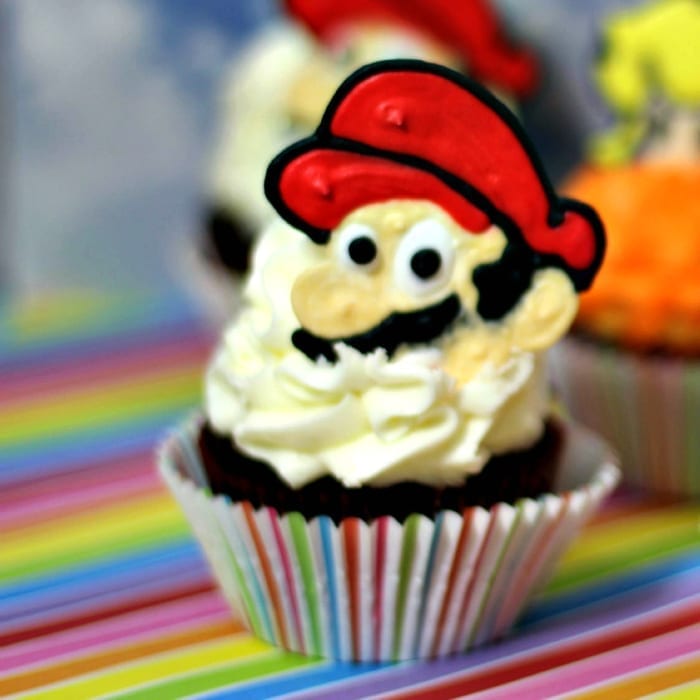
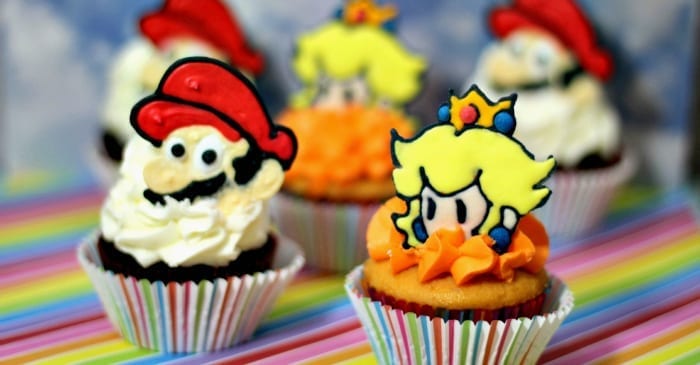
It’s the greatest love story never told – I spent as much of my young life wondering if Mario was ever going to find out what castle Princess Peach was in as I did doing my homework…well, probably more, if I’m being honest. And continuing to be honest, I’ll admit that I haven’t really been keeping up with their adventures in all the very latest Nintendo products, but there’s no denying the fact that these Mario and Princess Peach Cupcakes are probably the cutest things I’ve ever seen come out of a video game franchise. They would totally have these things at their wedding…assuming Yoshi didn’t gobble them all up first.

What You’ll Need to Make Mario and Princess Peach Cupcakes:
For the Mario cupcakes:
- 1 3/4 cups flour
- 2 cups sugar
- 1 cup cocoa
- 1 1/2 tsp baking soda
- 1 1/2 tsp baking powder
- 1 tsp salt
- 2 eggs
- 1 cup whole milk
- 1/2 cup oil
- 2 tsp vanilla
- 1 cup boiling water
For the Mario vanilla frosting:
- 1 cup unsalted butter, softened
- 4+ cups powdered sugar
- 4 Tbsp heavy whipping cream
For the Mario royal icing:
- 2 egg whites
- 1+ cups powdered sugar
- 1/2 tsp cream of tartar
- Nude, red, black, brown, blue, and white gel food coloring
For the Princess Peach cupcakes:
- 1/2 cup butter, room temp
- 2 egg whites, room temp
- 2 eggs, room temp
- 2 cups all-purpose flour
- 1 tsp baking powder
- 1/2 tsp salt
- 1/4 tsp baking soda
- 3/4 cup buttermilk
- 1 1/2 cup sugar
- 1 Tbsp peach extract
For the Princess Peach frosting:
- 1 cup unsalted butter, softened
- 4+ cups powdered sugar
- 1 Tbsp peach extract
- 3 Tbsp heavy whipping cream
- Orange gel food coloring
For the Princess Peach royal icing:
- 2 egg whites
- 1+ cups powdered sugar
- 1/2 tsp cream of tartar
- Yellow, pink, orange, red, and blue gel food coloring
How to Make Mario and Princess Peach Cupcakes:
For the Mario cupcakes:
Mix the flour, sugar, cocoa, baking soda, baking powder, and salt in a bowl. In a separate bowl, mix the eggs, whole milk, oil, and vanilla.
Add the bowl of wet ingredients to the bowl of dry ingredients and mix until fully incorporated. Then, using an electric mixer, beat for three minutes on a medium setting.
Slowly add the boiling water, starting with a small amount before pouring in the rest. The batter may be a little runny.
Scoop the batter into cupcake paper liners until they’re 3/4 full and bake at 350 degrees from 20-25 minutes. Allow them to cool before frosting.
For the Mario frosting:
Cream the butter and powdered sugar until it’s light and creamy. You can add several drops of heavy whipping cream if it looks too dry.
Test to see if the frosting can hold a stiff peak by turning a spoonful of it upside down. If the frosting stays on the spoon, it’s ready. If not, add more powdered sugar 1/4 cup at a time until it does.
Scoop the frosting into a pastry bag with a large tip and frost the cupcakes from the edges inward to the center.
For the Mario royal icing:
Mix the eggs, cream of tartar, and powdered sugar on medium speed for four minutes. If the icing can’t form peaks, add 1/4 cup of powdered sugar in increments until it does.
Find a picture of Mario that you like and print it out. Tape it to a large cookie sheet and cover the picture with a sheet of wax paper, and tape that down as well.
Divide the icing into thirds. Mix one third with the nude gel food coloring. Use it to outline the face and then color it in.
With the second third, mix in several drops of red gel food coloring for the hat and mouth. Outline them first and then fill them in.
Divide the remaining third into four bowls with 2 Tbsp each. In each bowl, add two drops of the brown, black, and blue food coloring, leaving the last one white. Use the black for the eyebrows, around the eyes, mustache, and inner eye, the blue for the eyes, the brown for the sideburns, and the white for the outer eyes and teeth.
Allow to dry for 5-10 hours, then peel the wax paper off the back of them and place on the frosted cupcake.
For the Princess Peach cupcakes:
Whisk the flour, baking powder, salt, and baking soda in a medium bowl. In a separate bowl, beat the butter on medium-high for 30 seconds.
Add the sugar and peach extract to the butter and beat until combined. Add the egg whites and eggs one at a time, beating well after each is added.
Alternate adding the flour mixture and the buttermilk, beating on low speed until everything is mixed together.
Scoop the batter into lined cupcake tins until they are 2/3 full, then bake at 350 degrees for 20-25 minutes. Allow them to cool before frosting.
For the Princess Peach frosting:
Cream the butter and powdered sugar until it’s light and creamy. You can add several drops of heavy whipping cream if it looks too dry. Add several drops of the orange food coloring and mix well.
Test to see if the frosting can hold a stiff peak by turning a spoonful of it upside down. If the frosting stays on the spoon, it’s ready. If not, add more powdered sugar 1/4 cup at a time until it does.
Scoop the frosting into a pastry bag with a large tip, then frost the cupcakes starting at the outer edge and swirling in a circle to the center. Build a second smaller circle on the base and then a center dollop.
For the Princess Peach royal icing:
Mix the eggs, cream of tartar, and powdered sugar on medium speed for four minutes. If the icing can’t form peaks, add 1/4 cup of powdered sugar in increments until it does.
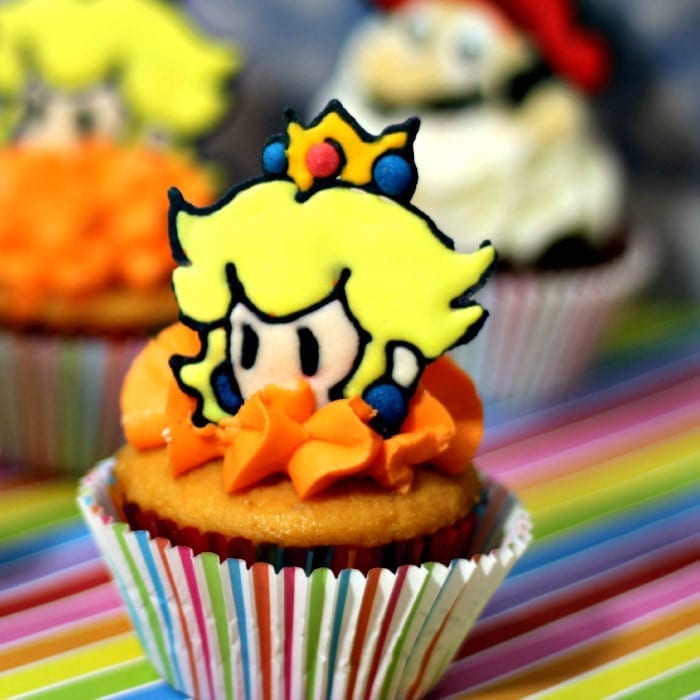
Find a picture of Princess Peach that you like and print it out. Tape it to a large cookie sheet and cover the picture with a sheet of wax paper, and tape that down as well.
Split the icing in half. Add several drops of yellow gel food coloring to one half and mix well.
Spoon 1/8th of the remaining icing into a bowl and add several drops of pink gel food coloring. To 2 Tbsp of the remaining icing, add the black food coloring. With the last 4 Tbsps of icing, make each a different color: orange, blue, and red, leaving the last Tbsp white.
Using a small pastry bag tip, outline the image with the black icing, then fill in the hair with yellow and allow to dry for 30 minutes.
Fill in the face with pink and let dry for another 30 minutes before adding the facial features in black icing.
Fill in the crown with orange and let dry. Add the red and blue jewels to the crown and fill in the earring with white.
Allow to dry for 5-10 hours, then peel the wax paper off the back of them and place on the frosted cupcake.
Mario and Princess Peach Cupcakes
Ingredients
Method
- Mix the flour, sugar, cocoa, baking soda, baking powder, and salt in a bowl. In a separate bowl, mix the eggs, whole milk, oil, and vanilla.
- Add the bowl of wet ingredients to the bowl of dry ingredients and mix until fully incorporated. Then, using an electric mixer, beat for three minutes on a medium setting.
- Slowly add the boiling water, starting with a small amount before pouring in the rest. The batter may be a little runny.
- Scoop the batter into cupcake paper liners until they’re 3/4 full and bake at 350 degrees from 20-25 minutes. Allow them to cool before frosting.
- Cream the butter and powdered sugar until it’s light and creamy. You can add several drops of heavy whipping cream if it looks too dry.
- Test to see if the frosting can hold a stiff peak by turning a spoonful of it upside down. If the frosting stays on the spoon, it’s ready. If not, add more powdered sugar 1/4 cup at a time until it does.
- Scoop the frosting into a pastry bag with a large tip and frost the cupcakes from the edges inward to the center.
- Mix the eggs, cream of tartar, and powdered sugar on medium speed for four minutes. If the icing can’t form peaks, add 1/4 cup of powdered sugar in increments until it does.
- Find a picture of Mario that you like and print it out. Tape it to a large cookie sheet and cover the picture with a sheet of wax paper, and tape that down as well.
- Divide the icing into thirds. Mix one third with the nude gel food coloring. Use it to outline the face and then color it in.
- With the second third, mix in several drops of red gel food coloring for the hat and mouth. Outline them first and then fill them in.
- Divide the remaining third into four bowls with 2 Tbsp each. In each bowl, add two drops of the brown, black, and blue food coloring, leaving the last one white. Use the black for the eyebrows, around the eyes, mustache, and inner eye, the blue for the eyes, the brown for the sideburns, and the white for the outer eyes and teeth.
- Allow to dry for 5-10 hours, then peel the wax paper off the back of them and place on the frosted cupcake.
- Whisk the flour, baking powder, salt, and baking soda in a medium bowl. In a separate bowl, beat the butter on medium-high for 30 seconds.
- Add the sugar and peach extract to the butter and beat until combined. Add the egg whites and eggs one at a time, beating well after each is added.
- Alternate adding the flour mixture and the buttermilk, beating on low speed until everything is mixed together.
- Scoop the batter into lined cupcake tins until they are 2/3 full, then bake at 350 degrees for 20-25 minutes. Allow them to cool before frosting.
- Cream the butter and powdered sugar until it’s light and creamy. You can add several drops of heavy whipping cream if it looks too dry. Add several drops of the orange food coloring and mix well.
- Test to see if the frosting can hold a stiff peak by turning a spoonful of it upside down. If the frosting stays on the spoon, it’s ready. If not, add more powdered sugar 1/4 cup at a time until it does.
- Scoop the frosting into a pastry bag with a large tip, then frost the cupcakes starting at the outer edge and swirling in a circle to the center. Build a second smaller circle on the base and then a center dollop.
- Mix the eggs, cream of tartar, and powdered sugar on medium speed for four minutes. If the icing can’t form peaks, add 1/4 cup of powdered sugar in increments until it does.
- Find a picture of Princess Peach that you like and print it out. Tape it to a large cookie sheet and cover the picture with a sheet of wax paper, and tape that down as well.
- Split the icing in half. Add several drops of yellow gel food coloring to one half and mix well.
- Spoon 1/8th of the remaining icing into a bowl and add several drops of pink gel food coloring. To 2 Tbsp of the remaining icing, add the black food coloring. With the last 4 Tbsps of icing, make each a different color: orange, blue, and red, leaving the last Tbsp white.
- Using a small pastry bag tip, outline the image with the black icing, then fill in the hair with yellow and allow to dry for 30 minutes.
- Fill in the face with pink and let dry for another 30 minutes before adding the facial features in black icing.
- Fill in the crown with orange and let dry. Add the red and blue jewels to the crown and fill in the earring with white.
- Allow to dry for 5-10 hours, then peel the wax paper off the back of them and place on the frosted cupcake.